In my last post about Docker, I went over container theory and some basic Docker commands. In this post, I will cover using Docker in an application development workflow. We’ll look at developing a Python/Flask API in a container using Docker.
Setting up a Development Directory
So, let’s have a look at a directory structure for our application.
user@host$ tree

├── Dockerfile
├── Pipfile
├── Pipfile.lock
└── src
    └── index.py
In our application’s root directory (which will be our container’s working directory) we store our Dockerfile. The Dockerfile is used to create an image that will be run inside of our container.
For an overview of what containers, images, and Docker are; see my post about the basics here.
For now, we’ll just create an empty Dockerfile. Later, we’ll cover the Docker image creation process.
user@host$ touch Dockerfile
We’ll also create a src directory that will hold our application code. Inside that directory, I’ll put an empty index.py file that will eventually become the entry point for our program.
user@host$ mkdir src
user@host$ touch src/index.py
We also have two files: Pipfile and Pipfile.lock. We’re going to use pipenv, the latest and greatest packaging tool for Python. pipenv uses these files to produce deterministic builds. This means that when we create our image on another host, the Python interpreter version and packages used will be exactly the same.
Creating Pipfile and Pipfile.lock Files
To generate the Pipfile and Pipfile.lock files, we’ll use pipenv to install our required python packages. In our case, that’s only Flask. First, make sure pipenv is installed.
user@host$ pip3 install pipenv
Then we’ll use pipenv to install Flask.
user@host$ pipenv install Flask
 Creating a Pipfile for this project…
 Installing Flask…
 Collecting Flask
   Using cached https://files.pythonhosted.org/packages/7f/e7/08578774ed4536d3242b14dacb4696386634607af824ea997202cd0edb4b/Flask-1.0.2-py2.py3-none-any.whl
 Collecting Jinja2>=2.10 (from Flask)
   Using cached
... output omitted ...
 Installing collected packages: MarkupSafe, Jinja2, click, itsdangerous, Werkzeug, Flask
 Successfully installed Flask-1.0.2 Jinja2-2.10 MarkupSafe-1.1.0 Werkzeug-0.14.1 click-7.0 itsdangerous-1.1.0

Adding Flask to Pipfile's [packages]…
 Pipfile.lock not found, creating…
 Locking [dev-packages] dependencies…
 Locking [packages] dependencies…
 Updated Pipfile.lock (e239e5)!
 Installing dependencies from Pipfile.lock (e239e5)…
   ?   ▉▉▉▉▉▉▉▉▉▉▉▉▉▉▉▉▉▉▉▉▉▉▉▉▉▉▉▉▉▉▉▉ 6/6 — 00:00:03
 To activate this project's virtualenv, run the following:
  $ pipenv shell
Now we have our Pipfile and Pipfile.lock files. As I wrote earlier, we will use those files to ensure that the code running in our container uses consistent versions of software.
cat Pipfile
[[source]]
name = "pypi"
url = "https://pypi.org/simple"
verify_ssl = true

[requires]
python_version = "3.5"

[packages]
flask = "*"

[dev-packages]
I didn’t instruct pipenv to use a particular version of Python, so it used the version installed on my host system (3.5). So, when we build our container image, we’ll start with a Python 3.5 base.
Build Image and Container
Files named Dockerfile are used to build images that go into containers. According to the Docker documentation:
An image is an executable package that includes everything needed to run an application–the code, a runtime, libraries, environment variables, and configuration files.
https://docs.docker.com/get-started/#docker-concepts
So, for our Python/Flask application we’ll start with a base image that contains the Python interpreter, and all the dependencies for running Python programs and scripts.
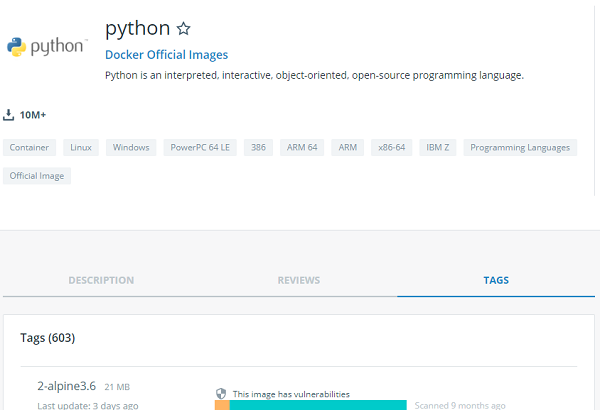
If you go to Docker Hub and search for “Python”, the top result is the official Python image. That image comes in many versions. I’ve chosen to use the version that’s based off of Alpine Linux and has Python 3.5. Alpine Linux is a very lightweight Linux distribution (~5MB), so it’s a good option for keeping containers small while still having everything needed to run programs.
To find the particular version of the image, click on the tags tab on the image’s page.

The image I chose to use was python, the official Python image with the 3.5-alpine tag. This image has what I said I wanted: an Alpine base with the Python interpreter version 3.5.
Create a Dockerfile
Here’s my Dockerfile.
FROM python:3.5-alpine
EXPOSE 5000
RUN pip install pipenv
RUN mkdir -p /app/src
WORKDIR /app
ADD Pipfile /app
ADD Pipfile.lock /app
RUN pipenv install --system --deploy --ignore-pipfile
ADD src/index.py /app/src
CMD ["python", "/app/src/index.py"]
The order of the statements in this file are important. Each one represents a layer. From the top, if a layer has not changed it’s statement will not be executed. For example, after the initial build of the image I probably won’t change which base image I’m using. Therefore, when I change a lower layer – perhaps the Pipfile.lock change – the base image will not be reloaded.
This layering approach is one of the many advantages of using Docker. Without needing to do any of the set up yourself, if you have multiple containers using the same base image, Docker efficiently uses the same downloaded base image for each container – instead of downloading and using multiple copies of the same image.
It’s important to layer a Dockerfile so that rebuilds are as efficient as possible. If a command on one layer is executed, lines on subsequent layers are too. So, layer your Dockerfile with the most frequent changes on the bottom.
Exposing Ports
The next line in the Dockerfile is:
Expose 5000
Containers have their own internal networking. The expose line is instructing Docker to allow access to the container’s network on port 5000. Port 5000 is the default port Flask uses.
Exposing ports only enables connecting to that port within the internal Docker network. Later, when we publish that port making it available to the host system.
Setting up Image Environment
The next few lines/commands in the Dockerfile are for building on to the base python:3.5-alpine image. First, on line 3, we make sure pipenv is installed. Then, on line 4, we make a directory named app in the root of the file-system, and inside that directory another directory named src.
The app directory will be the location within our newly created image where we’ll install our application code. This is reflected on line 5 where we set our working directory to /app.
Adding in Our Application Code
With the groundwork laid for out application, we now need to move in our code. First, on lines 6 and 7 of the Dockerfile, we add our Pipfile and Pipfile.lock files. On line 8, we issue a RUN command to install the dependencies enumerated in these files.
pipenv in Docker
In a non-Docker/container environment, pipenv creates a virtual environment – typically in the user’s home directory – and a mapping is made to the directory that constitutes that virtual environment. When I tried using pipenv with this virtual environment, the image kept rebuilding at this layer. Since we’re using a specific Docker image – with a definite version of Python, we don’t need this virtual environment. I added the following flags to the pipenv installation command
--system– instructs pipenv to use the system’s Python installation and not a virtual environment.--deploy– The install command will fail if thePipfile.lockis out-of-date, or Python version is wrong.--ignore-pipfile– Tells pipenv to only usePipfile.lockfor required packages and versions.
Now that we have everything we need for our application to function, on line 9, we add in our source code. Notice that where we’ve used the ADD command. If all we wanted to do was copy files into the image, we could have used the COPY command. ADD was used so that when the added files are changed, they will be updated inside of the image – when the image is rebuilt.
The last line in the Dockerfile is the command (CMD) to start the application.
Build the Image
With our Dockerfile complete, we can now use it to build the image that will be used in our application’s container. The form of the Docker command that builds images is as follows:
docker image build [OPTIONS] PATH | URL | -
To use our Dockerfile to build the image, we issue the following command.
user@host$ sudo docker image build -t myapp.v1 .
This tells Docker to build the image and tag it (-t) with the myapp.v1 tag, and to use the Dockerfile located in the current directory (. is an alias for current directory). The tag will help us identify and reference our image.
Create the Container
We want to create a container with the image we just built inside of it. The form of the command to do that is:
docker container create [OPTIONS] IMAGE [COMMAND] [ARG…]
To build our container there are the options we use.
user@host$ sudo docker container create --name=myapp -p 5000:5000 -v $(pwd)/src:/app/src myapp.v1
Here’s the break down:
--name=[NAME]– give the container a name that can easily be referenced-p [HOST_PORT:CONTAINER_PORT]– Publish port 5000 to the host machine on port 5000 of the host machine-v [HOST_DIR:CONTAINER_DIR]– mount a container’s directory to a directory on the host machine. We do this so we can edit our source code (develop our application) within the container.
Now that the container has been created, we can start it and start developing our application.
user@host$ sudo docker container start myapp
To make this simpler, we can create and start a container with one command using docker container run.
docker container run [OPTIONS] IMAGE [COMMAND] [ARG…]
user@host$ sudo docker container run -d --name=myapp -p 5000:5000 -v $(pwd)/src:/app/src myapp.v1
The -d flag instructs Docker to run the container detached. This means that the container runs in the background. It will not receive input or display output.
Live Editing within the Container
Now that we have our image created and running inside of a container, we’re going to want to do some active development. As our index.py file is empty, our application actually fails and the container ceases to function. So let’s add some hello world code to our index.py file.
 from flask import Flask
 app = Flask(__name__)

 @app.route("/")
 def hello():
     return "Hello World"

 if __name__ == "__main__":
     app.run(host='0.0.0.0')
Now when we start our container, it won’t error out and the Flask server will start running. If/when we edit our file(s), we’ll need to restart the Flask server for those changes to be reflected. Since the command that starts our container is the same as the command that starts the Flask server, we can restart our container when we update our application code.
First, let’s alter our hello world code. We’ll use Flask’s Response object to return a more HTTP response.
 from flask import Flask
 from flask import Response
 app = Flask(__name__)

 @app.route("/")
 def hello():
     res = Response("hello world")
     res.headers['Content-Type'] = 'text/plain'
     return res

 if __name__ == "__main__":
     app.run(host='0.0.0.0')
And we restart our container, and consequently Flask, to have the changes take affect.
user@host$ sudo docker container restart myapp
If you encounter issues. Another helpful command is docker logs. It will show you the output that’s logged to standard out and standard err.
user@host$ sudo docker container logs myapp