In my last post on the Arduino Uno, I took my first steps with the micro-controller and started getting data from a GPS module – the Ublox NEO 6M. Once I was able to receive data from the module – which was pretty neat by itself if you think about it, I wanted to actually do something with the data. I thought a good next step would be recording data and playing it back while plotting it on a map.
Trip Replay
On the map above, I’m replaying actual data collected using the Arduino Uno with attached GPS module. To read about how I connected the Uno to my computer, and the GPS module to the Uno, see this blog post.
The sample code I used to communicate between the module and the Uno (from this instructable), was giving me messages that looked like this:
Acquired Data
-------------
Lat/Long(10^-5 deg): 20841679, -156342754 Fix age: 37ms.
Lat/Long(float): 20.84168, -156.34275 Fix age: 59ms.
Date(ddmmyy): 220918 Time(hhmmsscc): 17422400 Fix age: 132ms.
Date: 9/22/2018  Time: 25:42:24.0 UTC +08:00 Malaysia  Fix age: 197ms.
Alt(cm): 999999999 Course(10^-2 deg): 0 Speed(10^-2 knots): 38
Alt(float): 1000000.00 Course(float): 0.00
Speed(knots): 0.38 (mph): 0.44 (mps): 0.20 (kmph): 0.70
Stats: characters: 260 sentences: 2 failed checksum: 0
-------------
This is great stuff, but all I needed to plot the data on a map was the latitude and longitude. I figured on time-stamping the data as well, so I could calculate things like how fast I was moving. Once I had the data and picked out the bits I wanted, I needed some means of recording it. So, I learned about shields. Shields piggy back onto the Arduino and provide extra functionality. In this case, I looked at using an SD card shield. This type of shield provides the Uno with the ability to read and write to an SD card.
Connecting the SD Card Shield
With the SD card shield installed, I followed this tutorial to set up communication with the SD card. First, I needed to #include the SPI.h and SD.h libraries. These libraries came packaged with the Arduino IDE, so simply adding the include statements added the libraries to the current sketch.
#include <SPI.h>
#include <SD.h>
Then, I needed to find out which pin was the chip select on the SD card shield. To do so, I looked in the manual for the shield. It turned out to be pin 10. Setting the chip select when initializing the SD card library (SD) essentially enables the shield and allows the Arduino read/write access to the card.
SD.begin([chip select pin #])
Parsing and Formatting the GPS Data
At this point I had everything needed to read and record the GPS data. The issue remaining: the output I was getting from the example code was not friendly for the project. I needed to edit the example code to pick out just the bits that I wanted (i.e. latitude, longitude, and timestamp), and format it to CSV.
The final draft of my code is on github, and here’s an example of the output:
initializing SD card...initialization done.

uBlox Neo 6M
TinyGPS library v. 13
loaded size: 115

20.843452,-156.343750,2018-09-22T19:48:54Z
20.843451,-156.343750,2018-09-22T19:49:00Z
20.843449,-156.343750,2018-09-22T19:49:05Z
20.843449,-156.343750,2018-09-22T19:49:10Z
Only the CSV lines are recorded to the SD card.
Away We Go! Getting Data on the Map
With the GPS data being recorded, I hopped in my car and went off on a trip. When I got home, I plugged the card into my computer and could see that the GPS records were successfully written. Now, all that was left was getting the data onto a digital map. To do this, I used Google Maps. Using the Maps API, and many of the other Google product APIs, requires a Google account and an API key.
Getting an API Key for Google Maps
To obtain an API key for calls to the Maps API, navigate to the Google Cloud Platform, and login with a Google account. After that, open up the developer’s console.
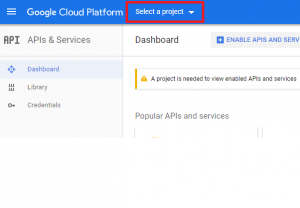
A project is also required for gaining access to resources such as the Maps API. There are multiple ways to do to create projects, but one way is by using the project drop-down menu that’s next to the Google Could Platform header in the bar that runs along the top of the screen (pictured below).

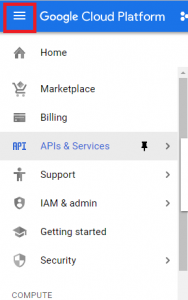
This will bring up a modal that will allow you to create a project. This should automatically set the active project to the newly created one, but if not use the project drop-down menu to select the newly create project. With your project set up, click on the navigation menu and select APIs & Services. From the APIs & Services dashboard, click on ENABLE APIS AND SERVICES.
Because I was planning on adding a map showing the recorded trip onto a website, I searched for and enabled the Maps JavaScript API. Upon doing this, I received an key – random character string – for the API.
Using the Maps JavaScript API
Now that I had the key for accessing the API, I cruised on over the API documentation and found the section for placing a marker on the map. After looking it over, the idea was to place a marker on the map at the first coordinate (latitude and longitude), then remove the marker and replace one at the next coordinate, and so on and so fourth. To make this action mimic the recorded trip, I would instruct the program to wait the delta of the timestamps from one coordinate to the next.
Adding the Map
The following HTML with embedded JavaScript will get the map to show up in a Web page.
<!DOCTYPE html>
<html lang="en">
<head>
    <meta charset="UTF-8">
    <meta name="viewport" content="width=device-width, initial-scale=1.0">
    <meta http-equiv="X-UA-Compatible" content="ie=edge">
    <title>Map</title>
    <style>
        #map {
            height: 750px;
            border: 1px solid black;
        }
    </style>
</head>

<body>
    <div id="map"></div>

    <script>
    function initMap() {
        var map;

        map = new google.maps.Map(document.getElementById('map'), {
            center: {lat: 20.806152, lng: -156.27991},
            zoom: 13
        });
    }
    </script>

    <script src="https://maps.googleapis.com/maps/api/js?key={YOUR_API_KEY}&callback=initMap" async defer></script>

</body>
</html>
Notice in the script tag that calls the Google Maps api, there are two parameters: key and callback. The key parameter is where you put the API key for accessing the Maps API. Replace {YOUR_API_KEY} with your API key. The callback is a function that’s called once the Maps JavaScript API is loaded. This function in our case is initMap, and it’s where we create the map and pass in an initial set of coordinates.
The instance of the map is stored in the map variable. This will come in handy later.
Placing a Marker
To place a marker on the screen, edit the initMap function as follows.
function initMap() {
    var map, marker;

    map = new google.maps.Map(document.getElementById('map'), {
        center: {lat: 20.806152, lng: -156.27991},
        zoom: 13
    });

    marker = new google.maps.Marker({
        position: {lat: 20.806152, lng: -156.27991},
        map: map,
        title: 'Start'
    });
}
The marker is stored in the marker variable, and to remove the it from the map simply call the following method.
marker.setMap(null);
Coding the Replay
With the map on the screen and the ability to place and replace a marker, all that was left to complete the task was to code the logic that read through the recorded GPS data and replayed it on the map.
Getting the GPS Data Into JavaScript
The most straightforward thing I could have done to have the data in JavaScript would have been to encode it into JSON in the first place. That is, write the data in JSON rather than CSV format. Nevertheless, CSV was the simplest and most versatile way to produce the GPS records in the first place, and it wouldn’t be hard to transform the CSV data into JSON or any other format.
What I ended up doing is copying the GPS data from the SD card into a file. Then, a PHP script I wrote parses that file and re-formats the CSV records into JSON.
<?php
define('LAT',  0);
define('LNG',  1);
define('TIME', 2);

$data = [];
$line = '';

// Open the data file for reading.
$file = fopen('data.csv', 'r');

// Move past UTF-8's BOM
fseek($file, 3, SEEK_CUR);

// The for loop runs until the end of the file.
// Each iteration a character is read into $c.
for ($c = fgetc($file); $c !== false; $c = fgetc($file))
{
    // If the character isn't a carriage return (\r), or a
    // newline (\n), concatenate it to the $line string.
    if ($c != "\r" && $c != "\n") {
        $line .= $c;
    }
    // If the character is a newline, break it up by the
    // comma into an array of strings, build an object
    // from the fields of the array with lat, lng, and
    // and time properties. Put that object into the
    // $data array.
    else if ($c != "\r") {
        $tmp = (object)[];
        $record = explode(',', $line);

        $tmp->lat  = floatval($record[LAT]);
        $tmp->lng  = floatval($record[LNG]);
        $tmp->time = $record[TIME];

        array_push($data, $tmp);
        $line = '';
    }
}

// Close the data file and print a JSON encoded
// version of the $data array.
fclose($file);
print json_encode($data);
So, whenever I call the script above, a translation of the GPS data CSV file will be returned in a JSON formatted string.
Requesting the JSON with AJAX
This blog is hosted by the Apache Web (HTTP) server. Apache is easily configurable to host PHP scripts. So, I set up Apache to host the translation script. With the following line added to my JavaScript code, I’m able to call that script from the Web browser.
fetch('https://path/to/translate.php')
Note: the Web server will need to allow Cross-Origin Resource Sharing (CORS).
The calling of the fetch function initiates a request for the server to run the PHP script and return the output. The JavaScript doesn’t wait for the server to return the request before executing other code. Instead the fetch returns a Promise. When the server finishes executing the PHP and returns the result, the Promise resolves and can be handled by a callback function.
This method of handling asynchronous requests is called AJAX – Asynchronous JavaScript And XML. If you’ve heard the term Web 2.0, this is what allowed the Web to “upgrade” to be a more interactive experience.
Here’s a copy of the actual AJAX request.
function initMap() {
    var map, marker, locData, i;

    const move = function() {
        // cycle through the GPS data and move the marker.
    };

    // The .then syntax is one way of setting up the callback function
    // for the data returned from the server. Here were using an anonymous
    // function as the callback.
    fetch('https://gps.polymorph.host/translate.php').then(function(data) {
        // The data is parsed into JSON and passed as `coords` to a function
        // that sets up map and places the initial marker.
        data.json().then(function(coords) {
            i = 0;
            locData = coords;

            map = new google.maps.Map(document.getElementById('map'), {
                center: locData[i],
                mapTypeId: 'hybrid',
                zoom: 13
            });

            marker = new google.maps.Marker({
                position: locData[i++],
                map: map,
                title: 'Start'
            });

            move();
        });
    });
}
Animate the Map
The move function steps through the data returned from the AJAX request. It pauses for the length of time between the current data point and the next data point then calls itself until there are no more data points to go through. The result is played out on the map above.
function initMap() {
    var map, marker, locData, i;

    const move = function() {
        marker.setMap(null);

        marker = new google.maps.Marker({
            position: locData[i++],
            map: map
        });

        if (i < locData.length) {
            let nextTime = parseInt(new Date(locData[i]['time']).getTime());
            let thisTime = parseInt(new Date(locData[i-1]['time']).getTime());
            let delta = nextTime - thisTime;
            setTimeout(move, delta);
        }

        return;
    };

    fetch('https://gps.polymorph.host/translate.php').then(data => {
        data.json().then(coords => {
            ... code omitted ...
            move();
        });
    });
</script>
<script src="https://maps.googleapis.com/maps/api/js?key=AIzaSyA16ptNpyC59zkzKGNdkvX_vVx3FAZR13Y&callback=initMap" async defer></script>


